First campaign start guide
- Add an affiliate network
- Add a traffic source
- Add an offer
- Add a landing page
- Add a postback
- Add a campaign
- Video
In this article we will explain how to launch your first campaign using Binom.
Add an affiliate network

1. Go to Aff. Networks and click Create
2. Click Load from catalog, if you want to load the aff. network from a template. If you want to add the aff. network manually, enter the name and specify Postback URL if needed.
3. Click Save
Add a traffic source

1. Go to Traffic Sources and click Create
2. Click Load from template, if you want to load a traffic source from a template. Binom has dozens of the most common traffic sources. You can quickly find the one you need by using the search bar. If you want to add a traffic source manually, enter its name first.
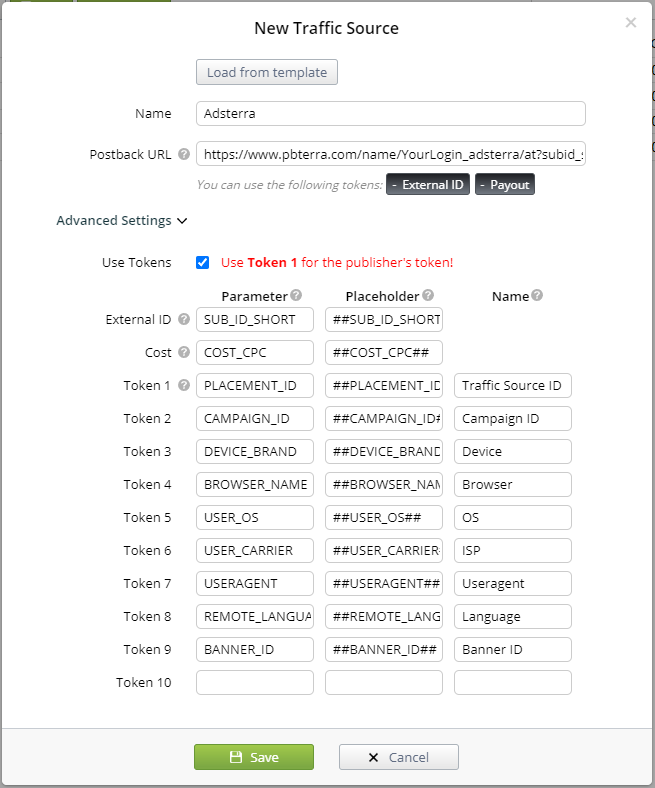
3. Check the Use Tokens box, if you want to use tokens (tokens transfer the information from traffic sources to the tracker, like ad numbers, publishers, OSs, devices, operators, and other parameters)
4. Add the tokens you want (in the example we're tracking age, sex, ads, and accounts)
5. Click Save
Add an offer
1. Log into the affiliate network, find an offer you want and copy its Unique link (if needed, send it for approval first)
2. Open Binom, go to Offers and click Create
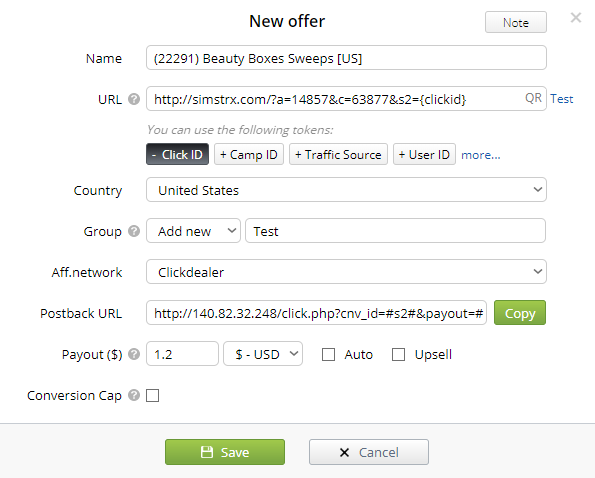
3. Enter the name of the offer
4. Paste the link you got from the affiliate network into the URL field
5. Add the {clickid} token after the &s1= parameter. The tracker will replace this token with a unique click ID, so you can get postback to the tracker when someone goes to the offer. Also change &s1= to &s2= (some aff. networks don’t allow to pass clickid to s1). In the end the link will look like this: http://simstrx.com/?a=14857&c=63877&s2={clickid}
6. Select the country, group, and affiliate network
7. Set the conversion value for the offer. If you check the Auto box, the cost will be automatically transferred into Postback URL. (more...)
8. Click Save
Add a landing page

1. Go to Landers and click Create
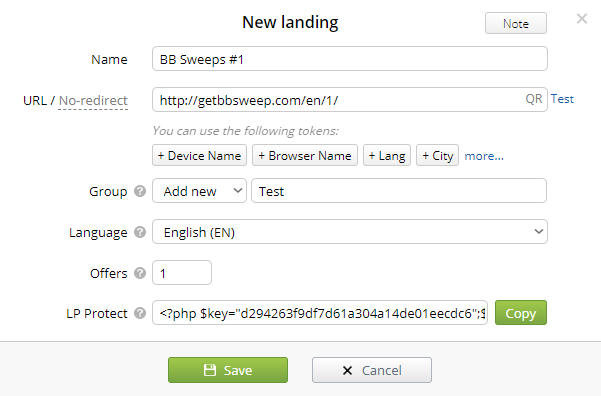
2. Enter the name, URL, and group of your landing page
3. Select the landing page language from the list
4. Enter the amount of offers on your landing page (usually it's one offer per landing)
5. If you want to protect your landing page from direct entries, go to Settings > LP Protect, copy the protection code and paste it into the LP Protect field of your landing page edit form (more...)
6. Click Save
7. Go to Settings, copy the Click URL link and paste it into your landings that must transfer users to an offer
8. If you have several offers, your links will look like this:
http://tracker.com/click.php?lp=1&to_offer=1
http://tracker.com/click.php?lp=1&to_offer=2
Add a postback

1. Go to Settings > Tracking links and copy the Postback URL
2. Go to the aff. network, find your offer, and paste the link into the relevant field
3. Change the {network_token} to #s2#. Your link will look like this:
http://tracker/click.php?cnv_id=#s2#
4. You can automatically transfer the offer payouts, just replace the token {payout} with #price# in your Postback URL and check Auto in the offer settings
Add a campaign

1. Go to Campaigns and click Create
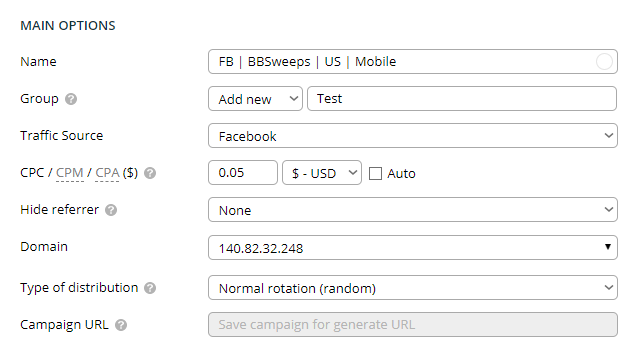
2. Enter the name, group, and select the traffic source
3. Set the cost per click (you'll be able to adjust it later by using the Update costs feature)
4. Select + Lander if you want to use a landing page, or select + Direct if you want to transfer traffic right to the offer
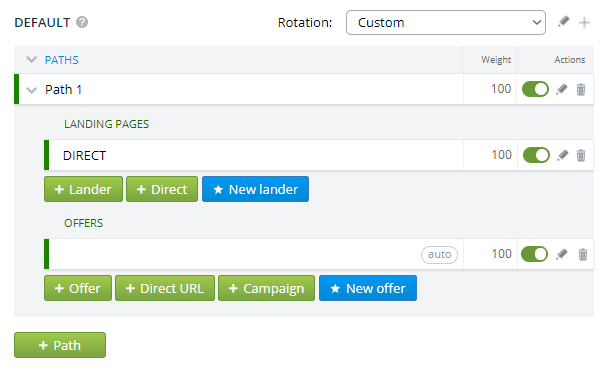
5. Click + Offer and select the offer you need
6. Click Save
7. A link appeared in the Campaign URL field will be used to run the purchased traffic
Now you can launch campaigns in the traffic source. For example, if our first campaign is created on testacc123@gmail.com, and aimed at the 20-25 female demographic, the URL will look like this:
http://tracker.com/click.php?
camp_id=1&key=28z6qx4x2rupso00l06h&age=20-25&sex=W&ad=ad1&acc=testacc123
Now you can launch campaigns aimed at various groups of people, and see the statistics for all of them.
Video