Warning: Undefined array key "HTTP_ACCEPT_LANGUAGE" in /var/www/html/check_language.php on line 6
FAQ
-
Functionality issues
-
Am I allowed to make server customization other than changing the server specs?
We cannot guarantee stable tracker work in case you temper with the server. All the changes that are made on your server by someone other than Binom team are made at your own risk.
-
I can't find some tracker features described in the documentation
Go to Monitor > Check Update and make sure you have the latest version of Binom installed.
-
Is there a way to recover a campaign/offer/landing/source if it was deleted?
It wasn't deleted from the tracker, it was just marked as deleted. To find it, just sort by All or Deleted. Then select an item you need and click Restore.
-
How to display more digits after the decimal point?
1. Go to Settings > Stats > Columns
2. Find a column you need and click an edit icon
3. Select any number you want in the Decimals dropdown menu and click Save
Superadmin role is required.
-
How does the algorithm for unique clicks work?
Every new click on your link is unique. But if it was registered in the tracker already, it's not unique anymore. The algorithm sends those clicks somewhere else.
-
How long does a click count as unique?
Go to Settings > Stats and specify this value in seconds in the Unique period field.
-
Can I see a user agent in the tracker?
Yes, you can see it on the Clicklog tab.
-
Mozilla Firefox is unable to display chat on the binom.org/panel/page/support page
Disable tracking protection and refresh the page.

-
Can I use Adspect, MagicChecker, Traffic Armor together?
Yes, you can. The click will be deemed as bot in one of the servicecs would acknowledge it as a bot.
-
Am I allowed to make server customization other than changing the server specs?
-
Choosing a server
-
Could you recommend a server?
Please take a look at this article.
-
I don't know anything about servers, can you help?
We can help you set your server right and install the tracker on it. It is absolutely free, just write to our support team.
-
Could you recommend a server?
-
Domains / DNS
-
Can I use several domains to log into the tracker?
No, you can use only one domain to log into the tracker, the one specified in the License field at binom.org.
-
Can I use additional domains for campaigns? How many?
Yes, you can use as many additional domains as you want.
-
Does the domain zone matter?
The domain zone doesn't matter for the tracker, but most of our clients use .com.
-
Can I use the external DNS services? Can you recommend one?
Yes, you can. DNSMadeEasy, CloudFlare.
-
Can I use CloudFlare as a tracker domain?
Yes, you can, but you have to turn off the caching. Otherwise you'll get the statistics delays and update troubles.

-
How to connect a domain to a server (GoDaddy)
You can direct your domain to the server as follows:
2. Delete od records (if applicable), press Add
1. Open My Products, find your domain and press DNS

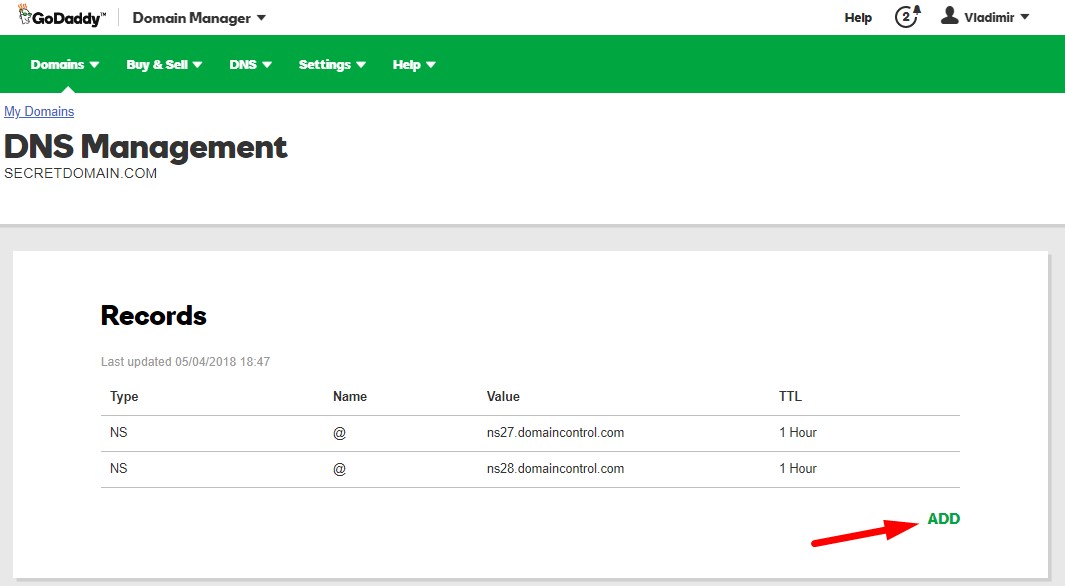 3. Add А-record with your servers IP
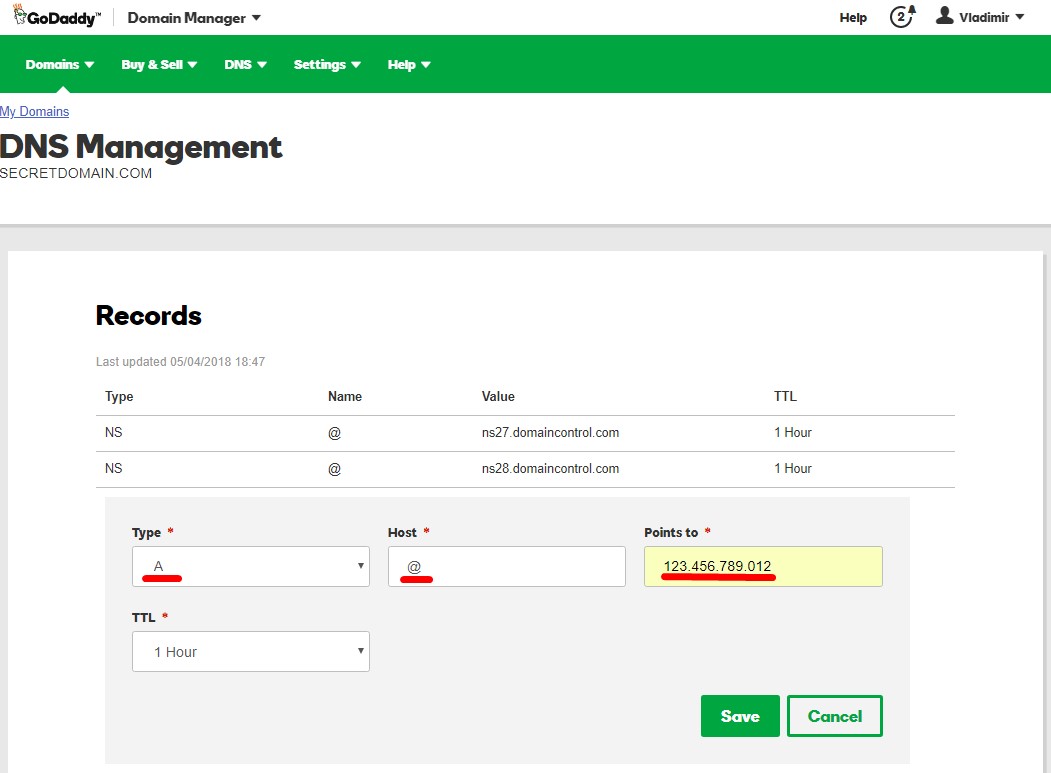 You can find additional manual here.
-
How to connect a domain to a server (Namecheap)
After you log into the NameCheap account, go to the Domain List -> click on "Manage" next to your domain -> “Nameserver” section
- Click on the "Namecheap BasicDNS" option in the drop-down list;
- Save changes - click the checkmark next to the nameservers.
Next go to “Advanced DNS” tab -> “Host records” section.
The Advanced DNS tab paste few records:
1. Type: A Record | Host: @ | Value: YOUR_SERVER’S_IP | TTL: Automatic
You can find additional manual here.
-
Can I use several domains to log into the tracker?
-
Payment
-
I can't unsubscribe from the beta. PayPal says the unsubscribe button is not available
Go to Settings > Payments > Manage pre-approved payments and unsubscribe from there.
-
I tried to make a payment through PayPal, but the account balance was insufficient
You have to unbind your PayPal account, add funds, then subscribe again and make a payment.
-
I made a payment, but Binom says Paid subscription days left: 0
Binom will refresh the information within one day.
-
I forgot to make a payment in time, have I lost my traffic?
If your license expires, you still have 7 days to make a payment. After that you won't be able to access Binom.
Your traffic and conversions will keep getting calculated.
-
What payment methods do you accept?
Currently we're accepting WebMoney, Capitalist and crypto. You can also pay via PayPal or Visa/MasterCard from your profile.
-
$99 for the first month, and $49 for each next month?
No, $49 a month is the price for each additional license:
1 tracker — $99 per month
2 trackers — $99 + $49 per month
3 trackers — $99 + $49 + $49 per month and so on
-
I can't unsubscribe from the beta. PayPal says the unsubscribe button is not available
-
Automatic installation (1Click Install)
-
Why do you recommend installing the tracker with 1Click?
Our script will automatically install the tracker on a clean server within 5-10 minutes. It also optimizes the environment to ensure maximum performance.
-
How can I add new domains to a server without a web-panel?
You can add new domains both for landings and tracking links by using our 1Click script.
-
Where can I find Binom files?
/var/www/binom/
-
Why do you recommend installing the tracker with 1Click?
-
Manual installation
-
Site error: the ionCube PHP Loader needs to be installed
You need to install ionCube loader 5+ on your server.
-
Invalid database access
You've entered a wrong MySQL root password.
-
Why the root access to MySQL?
Binom needs it to recover settings in case of MySQL reboots / crashes. Settings:
                [mysqld]
                sql_mode=''
                table_definition_cache=1600
                open_files_limit=5000
                event_scheduler=ON
                max_heap_table_size=2147483648;
-
How can I get a MySQL root password, if I have Plesk installed?
Login and password of MySQL root are the same as the admin's login and password of the panel.
Login — admin, password can be found in /etc/psa/.psa.shadow.
You can't use them to install Binom, you have to go to Plesk/phpMyAdmin, create a new user, and grand them all privileges.
-
Can't click Install. Browser console Error 500
Your server does not have php5-mysq installed.
-
How can I change the tracker's path on the server / move to another domain?
1. Carry the files to a new space
2. Check the configuration of virtual hosts
3. Go to /configuration/system.php and change the path:
              $this->general_dir=
              $this->add=
-
Fatal error: Uncaught exception 'Exception' with message 'There is no device with ID [generic] in the loaded WURFL Data' in
1. Install till step 3
2. In the installer folder /core/detect/wurfl/WURFL/ rename DeviceRepositoryBuilder.php to DeviceRepositoryBuilder.php.old, and DeviceRepositoryBuilder2.php to DeviceRepositoryBuilder.php
3. Install the tracker from step 3
4. When the installation is complete, give the files their original names (DeviceRepositoryBuilder.php > DeviceRepositoryBuilder2.php, and DeviceRepositoryBuilder.php.old > DeviceRepositoryBuilder.php)
-
Site error: the ionCube PHP Loader needs to be installed
-
Updates
-
How to update the tracker?
1. Go to the Monitor tab and click Check Update

2. New update! > Install

Updates occur in two stages. The first is the tracker's files update. If you manually changed index.php (not through the tracker's interface), rename it back before the update. Do not close the progress bar window during the process. Wait until the files are updated and click Finish.

3. The second stage is the tracker's database update, which starts automatically. This process can take several hours, depending on the size of your database. You can see the status of the update in the header of the tracker as shown below:

There may be errors and the statistics may disappear, but don't mind it. Everything will get back to normal after the update is complete. There's no need to stop your traffic during the update, however, do not load heavy reports, refresh the costs, or clear the campaigns.
Don't forget to clean your browser's cache and cookies when the update is complete.
-
How to update the tracker?
-
Log in / Authorization
-
How can I hide the login page?
Go to Settings > URL Customization and rename index.php. (more...)
-
Error 102
You should specify a domain that hosts your tracker in the License section of your account.
If domain is specified, check the server_name parameter in the virtual host settings of your web-server. It should look like this:
server_name your_domain;
-
Error 105
It means that your domain hasn't been added to the server yet. Please write to our support team if you added the domain more than 24 hours ago.
-
Error 106
Your server cannot send a request to our authorization server. Check your network and DNS settings (/etc/resolve.conf).
-
Error 107
This error occurs if you changed the tracker's files somehow. For example, changed the server, domain, subfolder, etc.
Please write to our support team.
-
Error 108
This error occurs when you fail to input correct login credentials 6 times in a row. If you are not the only user, please contact the administrator to have your login/password changed.
-
Error 114
The error occures when the connection to the license server cannot be established.
Please contact our support service.
-
Error 115
There is no active main license while there is an active additional license.
-
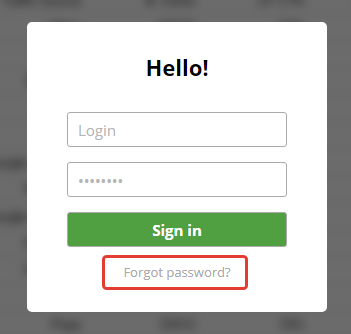
I forgot my login and password. What should I do?
Use the password recovery feature.
-
1227 Access denied
Make sure to specify a root access to MySQL.
-
How can I hide the login page?
-
Redirects
-
Fatall error: Uncaught exeption 'Exeption' with message 'There is no device with ID [generic] in the loaded WURFL Data'
Rename
трекер/core/detect/wurfl/WURFL/DeviceRepositoryBuilder.php to трекер/core/detect/wurfl/WURFL/DeviceRepositoryBuilder1.php, and
трекер/core/detect/wurfl/WURFL/DeviceRepositoryBuilder2.php to трекер/core/detect/wurfl/WURFL/DeviceRepositoryBuilder.php.Then follow your link and give the files their original names.
-
Fatall error: Uncaught exeption 'Exeption' with message 'There is no device with ID [generic] in the loaded WURFL Data'
-
Traffic sources
-
I can't specify a key parameter for a traffic source token
This is a service parameter, you can't use it.
-
Use token 1 for the publishers token! What does it mean?
Campaign reports are loaded much faster if grouped by the first token. So we recommend you to specify in the first token what you most frequently check the statistics for.
-
The Facebook statistics show less clicks than the tracker
It's OK. Some mobile apps preload content in order to increase the download speed if a user clicks the ad.
If you want the tracker to filter these clicks, open /configuration/system.php and add this line to the var block:
var $fb_prefetch_filter=1;
-
I've turned on the traffic of only one / two operators (ISP) for a traffic source, but for some reason the tracker shows two / more
It's OK, but you can check the IPs. Chances are the traffic source sends traffic through several ISPs.
-
I can't specify a key parameter for a traffic source token
-
Campaign settings
-
What's the difference between an offer and a landing?
Landing is the halfway point of a click, and offer is the end point.
-
How to transfer costs from a traffic source to Binom?
Use the CPC/CPM/CPA field in the campaign settings and/or the Cost token in the traffic source settings. (more...)
-
My campaign has a fixed cost per click, the traffic is running, but costs are not being calculated
Check what you specified in the settings: CPC (cost per click) or CPM (cost per 1000 clicks).
-
How do traffic losses get counted?
Specify a traffic loss percent, and it will be added to CPC.
-
No landing pages in Path
If you want to run the traffic directly to an offer, just select Add Lander > Direct.
-
What's the difference between an offer and a landing?
-
Reports
-
Can I display only tokens without marks?
Filter by NOT IN # or by certain names.
-
There's a lot of Unknown clicks in the LP tokens report, what is it?
If these tokens are exit points from the landings, then the clicks are bots and those who didn't go from landings to offers.
If these tokens are from your token update scripts, then either the scripts don’t work, or clicks are bots.
-
Can I display only tokens without marks?
-
Landing Pages
-
How can I upload landings to a server if I don't have a web-panel, and the tracker was autoinstalled?
Try using FileZilla.
Download and install the software, open it, and enter your server's SSH information:

Где: Host — IP address of the server
Username — root
Password — root user's password
Port — 22When connecting for the first time, you'll see a message saying the host key is unknown. Check the box and click OK:
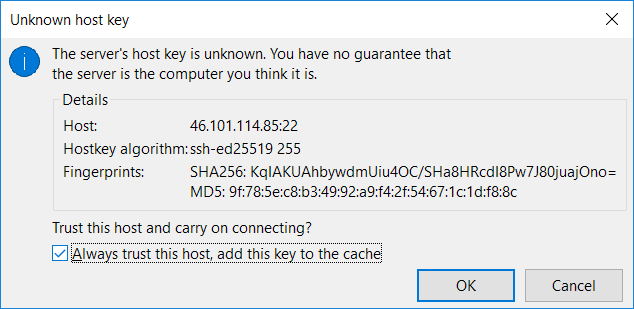
When connected, you'll see home directory of the server (usually it's /root). In order to upload files to a web server, you need to go to /var/www/. From there you have two options:
-
You want to have landing files on the same domain with the tracker
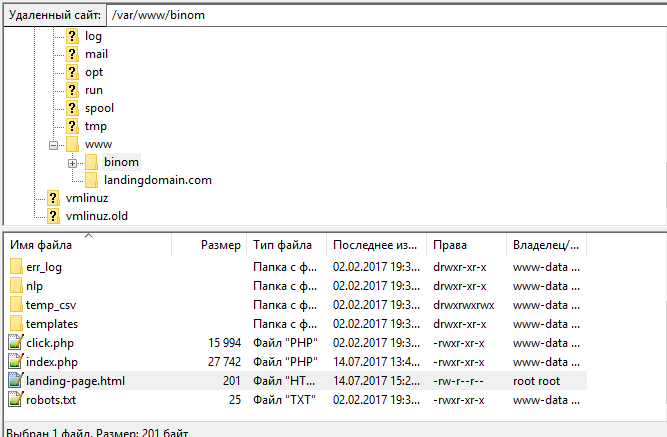
In this case, just put the files directly in the /var/www/binom folder. We've put there a landing page file landing-page.html in the example below:
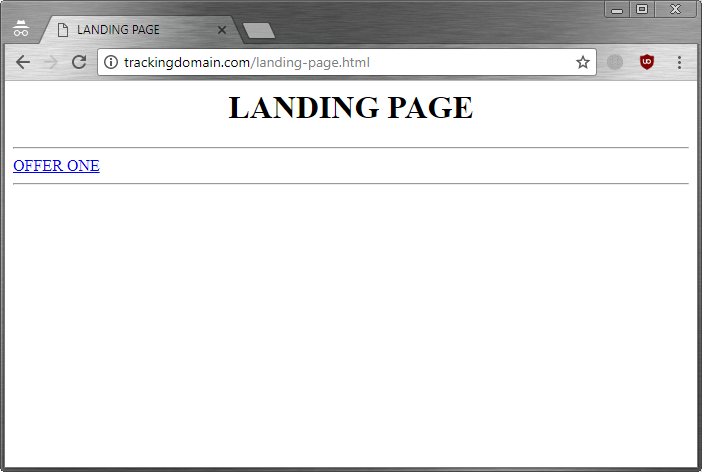
Now the page is accessible on the Internet via the link domain_of_the_tracker/landing-page.html:
Similarly, you can create folders in the /var/www/binom directory. For example, if we create a folder /var/www/binom/content/landings/1 and put the index.html file there, we'll be able to open this file at домен-трекера/content/landing/1/index.html.
-
You want to have landing files on a separate domain
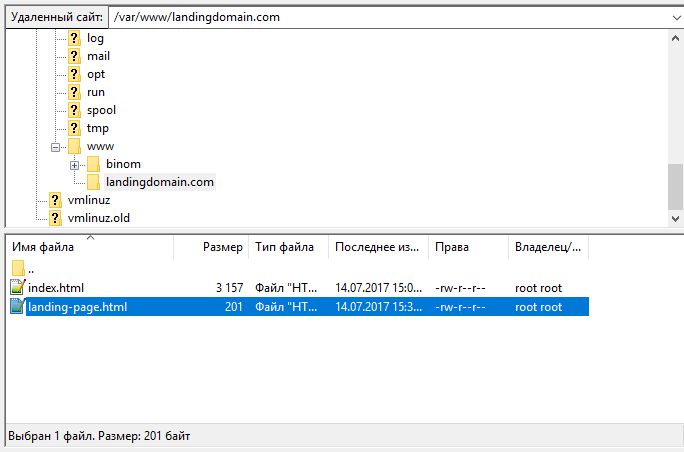
By using our 1Click script you can create an additional domain for landings, and then add files to a new additional domain folder. We created a domain landingdomain.com: in the example below:

Now we can upload files to a folder of the new domain:
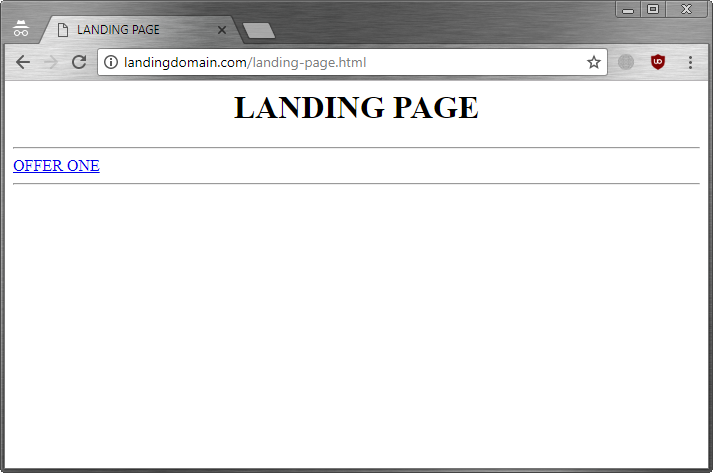
Now the page is accessible on the Internet via the link домен-для-лендинга/landing-page.html:
-
You want to have landing files on the same domain with the tracker
-
How can I create an additional domain for landings, if I don't have a web-panel and the tracker was autoinstalled?
Use these manuals:
-
Domain setup
You can set your domain through your domain provider, or through your DNS service, if you use it. There are two ways:
— Add an A-record and specify an IP address of your server with the tracker on it
— Add a CNAME-record and specify your main domainThe advantage of the second way is that if you change a server IP address, you won't have to change it for all domains, just for your main one.
After the setup you have to wait until the time zones are updated, this can take up to 24 hours. You can check if domain is attached at whatsmydns.net.
-
Server setup
Our 1Click installer can generate a free SSL. So if you want to add https to your domain, make sure that domain is linked with your server.
1. Connect to the server through SSH (more...)
2. Download the latest version by executing this command:
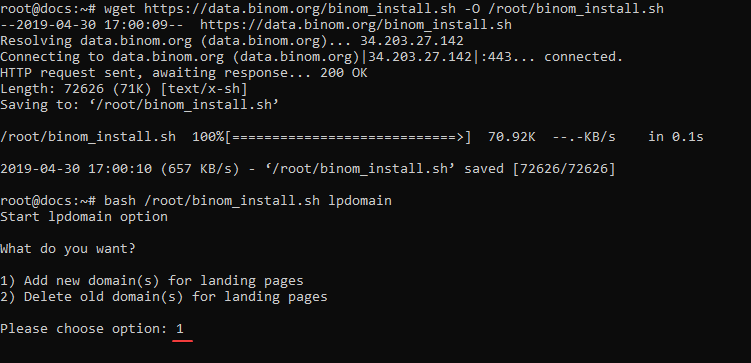
wget https://data.binom.org/binom_install.sh -O /root/binom_install.sh
3. Execute this command:
bash /root/binom_install.sh lpdomain
4. Enter 1 and press Enter:
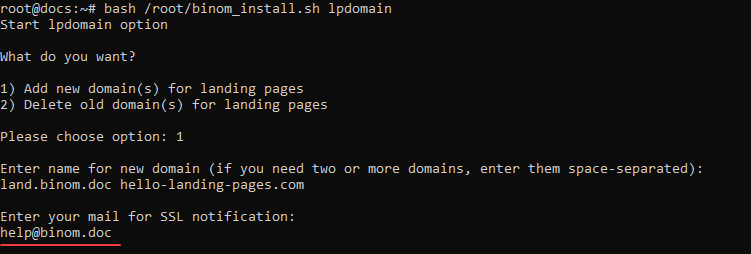
5. Now enter the name of your new domain and press Enter:

6. Enter your email to generate a free SSL for your domain:
7. In the end you'll see file paths for each domain (/var/www/your_new_domain):

-
Domain setup
-
I created a landing page, but clicks don't lead to an offer. Why?
You probably forgot to add click.php?lp=1) to a tracker link in your landing file. Or maybe you changed it by adding another value.
-
LP CTR dropped drastically after adding LP Protect to a landing
Make sure that you use the lp_key token in the landing link. The tracker also may have conflicts with regional DNS/Proxy and you might want to disable this check in the tracker:
1. Open the /configuration/system.php file and add the following line after the var $add; block:
var $lp_protect_ignore_ip=1;2. Save the file
3. Refresh the tracker
4. Copy the new LP Protect link from the tracker and change the previous link in all the landings where you used LP Protect
-
I added LP Protect, but can open the landing anyway. The code is just being displayed above
Your landing must have the .php extension.
-
Can I transfer traffic directly to a landing?
Yes, you can. (more...)
-
Why is my LP CTR so high?
Check if you selected Direct. Such clicks are not counted to LP CTR.
-
I'm using LP Pixel and run traffic to a landing directly, but LP CTR is not mentioned in the statistics
Maybe you selected Direct in the campaign settings. If so, change it to Lander.
-
I run parameters from a landing, but often see Unknown in the report
These are the bots that don’t click on the links and just load HTML.
-
Can't upload a landing archive/file to the tracker
Go to the /landers directory and check permissions (644) and the owner (web server). If the permissions are correct, then most likely you have a standard web server uploading limit (2 MB). You can change it in the web server settings.
-
How can I add an LP protect code to an integrated landing?
There's no need to add this code, because a landing gets loaded by the campaign link. Its direct link does not appear anywhere and is only visible to you (if you check the full path to the landing file).
-
How can I increase the maximum upload size of an integrated landing file?
If you have nginx, open the nginx.conf file, find the http section and add:
client_max_body_size 100m;If you have Apache2 (httpd), open the apache2.conf file and add this:
LimitRequestBody 102400000
-
How to increase the number of uploading landing files?
Open php.ini and fix the max_file_uploads parameter.
-
The LP Protect code hides landings even with the specified LP protect key on some domains
If you have this problem, it's probably because of some DNS routes related issues. Try this:
1. Open the /configuration/system.php file and after the var $add; block add:
2. Copy the new LP protect code and change the previous one to it for all your landings (you'll lose the clicks if you don't change it, as the old one won't work).var $lp_protect_ignore_ip=1;
-
How can I set a redirect or something else (using LP protect) instead of just hiding a landing?
At the end of the LP Protect code, instead of exit(0); insert your php-code.
-
How can I upload landings to a server if I don't have a web-panel, and the tracker was autoinstalled?
-
Postback / Conversions
-
How can I send postback to several trackers at once?
You can use this script.
-
Is it possible to get conversions for viewing pages?
Yes, it is. (more...)
-
There are no conversions in the tracker
Make sure you have the {clickid} token specified in the offer settings. If you do have it, check if the offer has a postback specified.
-
I don't get conversions from Mundomedia
You have to add ?a=a to your offer link. It must look like this:
https://domain.com/mt/xxxxxxxxxxxxxxxxxxx/?a=a&subid1={clickid}
-
Postback in an affiliate network is correct, clickid is displayed, but there are no conversions in the tracker
Check if you have a global postback specified. Most likely you do, and it's different from the current one.
-
How can I get several payouts per one lead? In case of the subscription, for example
Check the Upsell box in the offer settings. (more...)
-
Why is there a postback on the Affiliate Networks tab?
If you set a postback in the network settings, then you'll see this postback when creating a new offer. It will be easy to copy and paste it in an affiliate program of an offer.
-
How can I send postback to several trackers at once?
-
API
-
How can I change api_key?
Change your login and password.
-
I can't specify key in the token sources settings
This is a service parameter, you can't use it.
-
"["error","Update costs is already running. Please, try again later."]"
You get this if you try to refresh the expenses when the previous refreshment process is still running.
-
How can I change api_key?
-
Users
-
Not all campaigns are shown to a user
Check if there are any traffic sources restrictions. Сampaigns with forbidden sources are not displayed.
-
Why I can't see some tracker settings?
All the tracker settings are available only to a superadmin (the one specified during the tracker installation).
-
How can I see the admin statistics on the campaigns tab?
You can't. Admins are assigned to all campaigns by default, so just sort by All.
-
Not all campaigns are shown to a user
-
Binom is not working
-
Every day at the same time I can’t log into the tracker, the redirects don’t work
Disable the backup on the server.
-
Fatal error: Uncaught exception PDOException with message SQLSTATE[HY000]: General error: 1030 Got error 28 from storage engine
There is not enough space available on the disk.
-
Every day at the same time I can’t log into the tracker, the redirects don’t work
-
Service issues
-
How can I add fields / IPs in criteria / rules?
Open the php.ini server file and fix this value:
Restart your web server to apply the changes.max_input_vars =
-
Warning: date(): It is not safe to rely on the system timezone settings. You are required to use the date.timezone setting or the date_default_timezone_set() function
You need to specify a timezone in php.ini. For example:
Here you can find all the timezones.date.timezone = Europe/Moscow date.timezone = Europe/Kiev date.timezone = Europe/Berlin
-
How can I add fields / IPs in criteria / rules?
-
Backup
-
Where are the settings stored?
In MySQL database.
-
I can't import the settings, there is no Import button
You can import the settings only to the newly installed tracker.
-
Can I carry all the tracker settings from one server to another?
Yes, you can. If you want to carry only the settings without the statistics, go to Settings > Import/Export.
If you want to carry the statistics as well, check out the manual down below.
-
Can I carry all the tracker settings and the statistics from one server to another?
Yes, but it works only if you carry them to new MySQL/Percona 5.7. The whole process can take up to 24 hours, so just write to our support team, and we'll help you. It's absolutely free.
In order to carry the database, you need to install the same version of the tracker with the same database name on a new server.
The following method carries all MySQL databases at once. Only the new databases will work on the new server, and you won't be able to merge them with the old ones.
-
How to
Let's make things simple:
server1 — a server you carry databases from
server2 — a server you carry databases to
folder1 — a folder on server1 that you need to create (for example mkdir /root/mysql)
folder2 — a folder on server2 that you need to create (for example mkdir /var/lib/mysql_backup)
/folder1 and /folder2 must not be the real paths of your current MySQL files.1. Install xtrabackup:
apt-get install percona-xtrabackup-24You can check the officialinstallation manual. To put it simply:
                      wget https://repo.percona.com/apt/percona-release_latest.$(lsb_release -sc)_all.deb
                      dpkg -i percona-release_latest.$(lsb_release -sc)_all.deb
                      apt-get update
                      apt-get install percona-xtrabackup-24
2. Install Screen:
apt-get install screen3. To create a backup, you need at least the same amount of space as taken by all your MySQL databases. You also need some space to create an archive, which you'll carry to another server.
Usually there is no extra space, so perform backup to a remote server. To do this, install SSHFS on the server you carry databases from:apt-get install sshfs4. Execute the following to mount a folder:
sshfs username@server:/folder2 /folder1sshfs root@192.168.1.1:/var/lib/mysql_backup /root/mysql)5. Make sure there is no traffic coming to the tracker. Or just stop nginx:
service nginx stop6. Create a new session in Screen:
screen -S "Binom_backup"Execute the following to start the backup process:
                      innobackupex --no-timestamp --user=root --password=PASS /folder1
                      innobackupex --no-timestamp --user=root --password=PASS --apply-log /folder1
PASS — MySQL root password
(for exampleinnobackupex --no-timestamp --user=root --password=PASS /root/mysql)
innobackupex --no-timestamp --user=root --password=PASS --apply-log /root/mysqlDepending on the database size, the backup can take from 5 minutes to several hours. If your session stops for some reason, the backup won't be cancelled. You can get back to the session by executing:
screen -r "Binom_backup"7. Stop MySQL on a new remote server and replace the database files with the backup files:
service mysql stop
mv /var/lib/mysql /var/lib/myslq.old
mv /folder2 /var/lib/mysql chown -R mysql:mysql /var/lib/mysqlservice mysql stop)
mv /var/lib/mysql /var/lib/myslq.old
mv /var/lib/mysql_backup /var/lib/mysql
chown -R mysql:mysql /var/lib/mysql8. Now your MySQL root password of server2 is the same as of server1, and you need to change it:
— Open the system.php file in the tracker folder (the default path is/var/www/binom/configuration/system.php)
— Find a line with$this->password=
— Change the old MySQL password
— Save changes9. Execute:
                      service mysql start

                      mysql_upgrade -uroot -p -f
10. Restart MySQL:
service mysql restart11. Carry the key.cpatools file from the old server to the new one:
                      scp /var/www/binom/configuration/key.cpatools
                      root@server2:/var/www/binom/configuration/key.cpatools
12. Unmount the remote folder (execute on the old server):
fusermount -u /folder2fusermount -u /root/mysql)
Check your new tracker.
-
How to
-
Where are the settings stored?
-
Monitor
-
Error 203: Incorrect value in max_heap_table_size (....)
In MySQL settings (my.cnf) specify:
max_heap_table_size=2147483648Restart MySQL.
-
Error 204: EVENT function is disable
In MySQL settings (my.cnf) specify:
event_scheduler=ON
-
How can I enable server information display?
Server information display is enabled by an additional script which is already integrated into our 1Click Install.
If you see the Monitoring script is out of date, you just need to update the script. Execute these commands one by one:wget data.binom.org/binom_check_space.sh -O /root/binom_check_space.sh bash binom_check_space.sh
-
Error 203: Incorrect value in max_heap_table_size (....)
